
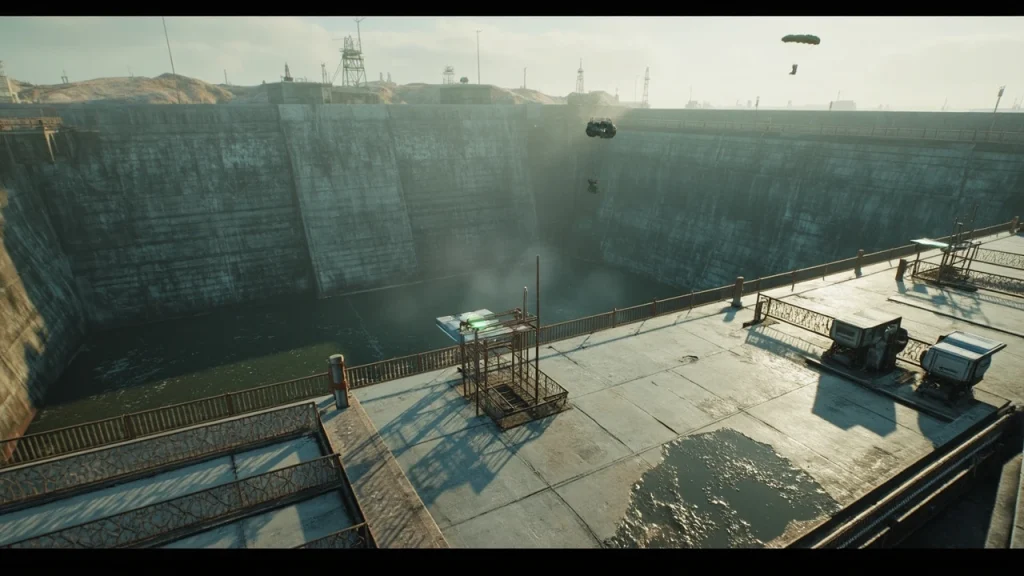
Call station Dam Battlegrounds: what it is and why it matters in ARC Raiders
The Dam Battlegrounds map in ARC Raiders holds a tight cluster of Call Stations near the central dam structure, and that single piece of geography shapes almost every fight on the field. The antennas sit on the spillway side of the dam, on the service gantries that run along its face, and on the flat concrete pads in front of the main wall. Because the cluster is small, most of the early action on this map happens in a few hundred meters of terrain, and the supply drops that come out of those antennas tend to be the most reliable mid-tier loot on the rotation.
This guide is written for a player who has already cleared the tutorial, knows the basic extraction loop, and wants a more reliable way to handle the call station Dam Battlegrounds situation specifically. The focus is on map context, route planning, the timing risks of the call animation, and the realistic alternatives when the central cluster is already taken. It is meant to sit alongside similar planning for Buried City, The Blue Gate, Spaceport, Stella Montis, and Riven Tides rather than replace them, since each of those maps has its own call distribution and its own risk profile.
How Call Stations work on Dam Battlegrounds
A Call Station is a small antenna placed in an open area on an ARC Raiders map. The interaction is simple. You walk up to it, hold the prompt, and the game begins a summoning animation that fires a flare straight up into the sky. The flare is visible to every other player in the lobby, which makes it work as both a confirmation that the drop is on the way and a beacon that announces where you are. The pod drifts down on a parachute, and you breach the container on landing to collect ammo, crafting materials, and basic supplies.
On the Dam Battlegrounds map, these antennas sit in a tight central region rather than being spread out across the field. The clustering has two practical effects. First, the distance between any two Call Stations is short enough that a single squad can rotate between several in one sortie if the first drop has already been looted. Second, the same density means every other squad has the same idea, so the central area is where most of the early-game fights happen. If you intend to farm this map, you have to plan for the fact that you are not the only one heading there.
Before you commit to a call, the mechanics that matter are the same as on any other ARC Raiders field:
- Spawn is not guaranteed. Call Stations do not appear in the same place every match, and a previously documented pin may be empty when you arrive. Treat any pin list as a starting point, not a contract.
- The flare exposes you. The summon animation fires a vertical flare that the entire lobby can see, so plan a defensible position and a clear extract route before you start the call.
- Other raiders can loot first. A pod that has already been breached holds nothing for you, so visual confirmation that the container is still sealed matters as much as the route to the antenna itself.
- The call takes time. You cannot cancel the summon halfway through, and the animation leaves you standing still in the open while the flare climbs.
These behaviors are described for the broader system on the ARC Raiders supply drop call station reference, and they apply unchanged to the antennas on Dam Battlegrounds. Reading the reference page first makes the rest of this guide easier to follow, since every decision below comes back to those four points.
Reading the central Dam Battlegrounds cluster
The Dam Battlegrounds map centers on a concrete dam wall, a long spillway, and a network of service walkways and outbuildings. The terrain is industrial and vertical: a lot of the usable space is on raised concrete, and the lower areas around the spillway tend to be wetter, darker, and harder to retreat through. Call Stations on this map tend to spawn on the flatter, more exposed pieces of terrain in this area, which usually means gantries, dry concrete pads, low rooftops, and the open apron in front of the dam’s main structure.
When you approach a cluster, treat the antenna as the center of a small tactical zone rather than a single point on the map. Inside that zone, three sub-areas tend to control the engagement:
- The call platform. The open pad around the antenna itself. This is where you must stand still long enough to summon the pod, so it has to be clear of hostiles before you commit. A platform with bodies, bloodstains, or an active flare is already a lost call.
- The cover ring. The nearest walls, shipping containers, vehicle husks, and railings. You will use these during the summon animation and again after the pod lands, so a Call Station without a usable cover ring is not worth the flare it produces.
- The overwatch lanes. Slightly elevated positions that look down on the call platform. A squad that holds one of these controls who can safely call and who cannot, which is why the central antennas tend to flip ownership several times during a busy match.
Thinking in those three rings keeps the decision honest. If you cannot secure the cover ring and the overwatch lane at the same time, summoning a supply drop on that antenna is a gamble, even if the antenna itself is empty. The same is true if your only escape route runs back through the spillway, where a single enemy on a high gantry can cut you off for the rest of the round.
The spawn pattern of Call Stations on this map
Across many sessions on Dam Battlegrounds, the same handful of positions keep showing up. They are not guaranteed every match, but they are the positions worth memorizing first because they cover most of the central cluster.
| Position label | Terrain type | Cover nearby | Overwatch risk |
|---|---|---|---|
| Spillway apron | Open concrete pad in front of the dam wall | Low walls, one shipping container | High. Two gantries look down on it. |
| Lower service gantry | Long metal walkway along the dam’s base | Railings, one concrete buttress | Medium. One side has a clear line of sight from the upper gantry. |
| Upper service gantry | Elevated metal walkway with a guardrail | Railings, a small control room | Low. Few positions look up at it directly. |
| Rooftop of the east outbuilding | Flat roof, low parapet | Parapet wall, roof access door | Medium. Exposed from the spillway apron. |
| Rooftop of the west outbuilding | Flat roof, multiple vents | Vent covers, an antenna mast | Medium. Exposed from the upper gantry. |
| Dry concrete pad by the intake | Open pad next to the water intake tower | Intake tower wall, a parked truck | High. Clear line from the upper gantry and the spillway. |
Each of these positions plays differently. The upper service gantry is the safest call in a busy lobby because few angles look up at it, but the breach after the pod lands is slow because the pod tends to drift sideways off the gantry. The spillway apron is the fastest call but the worst defense, since two overwatch lanes cover it at once. Treat this table as a starting menu rather than a fixed answer: the antenna that spawns on a given match is the one you have to play around.
Route planning: how to reach a Dam Battlegrounds Call Station first
Reaching the antenna before other squads is half the challenge on this map. The other half is leaving with the loot. A reliable approach has four phases: drop-in commitment, approach, call window, and extraction. Each phase has a specific decision, and the order matters because a bad call in phase one usually forces a bad call in phase three.
1. Drop-in commitment
Decide before you land if you are going for a specific Call Station or for general scavenging. The central dam complex is the obvious choice, but a contested central antenna can be a trap, especially if a squad with better gear has already committed to the same pin. If your squad is lightly geared or running a short timer, consider a flank entry from the side gantries or the lower service roads rather than the main apron. The map rewards a clean line of approach over a fast but exposed sprint, because a sprint that ends in a fight you cannot win is just a faster death.
2. Approach
Use the spillway walls and outbuildings to break up your silhouette as you move toward the cluster. Listen for the call animation’s audio cue, because a flare in the sky usually means another squad is already at one of the antennas. If you hear the cue while you are still on approach, you have two real options: commit to a different antenna in the same cluster, or hold at the edge of the cover ring and wait for the fight to resolve. Pushing into a call that is already in progress is a high-risk play that should only happen when you have a clear advantage in position or numbers.
3. Call window
Once you reach an unclaimed antenna, clear the immediate platform and one strong piece of cover before starting the summon. Position yourself so the flare shoots away from the most likely lines of sight, and keep a teammate on the overwatch lane to delay any third party. The call animation is the most vulnerable moment in the loop, so treat the platform like a brief reload window: you cannot move, and every other active squad in the lobby knows exactly where you are. If you cannot secure the cover ring and the overwatch lane in the same time it takes you to walk to the antenna, the call is not safe.
4. Extraction
As the pod descends, watch the parachute line. The pod’s landing point can drift several meters depending on the angle of the chute and the surrounding geometry, so the breach position is not always directly under the antenna. Move to the pod as soon as it touches down, breach quickly, and decide on the spot whether to extract or to push toward a second antenna while the lobby is still reacting to your flare. If you intend to push for a second call, plan the rotation before the first breach; if you intend to extract, the safest moment is the second after the container opens, not the second after you finish looting.
What to do when the central cluster is already taken
On a busy lobby, the central Dam Battlegrounds antennas are often claimed within the first minute. Three responses tend to work better than a frontal contest against a squad that has already set up.
- Take the outer antennas. Call Stations that sit on the edges of the central area, on low rooftops or service pads, are still on the Dam Battlegrounds map and still feed the same supply drop system. They get less traffic because they are slightly farther from the obvious loot path, but they still produce the same container of materials.
- Wait for the second wave. The flare from the first squad draws attention, and a second squad that pushes in usually creates a three-way fight. The team that arrives third, after the first two squads are weakened, can claim the pod and use the existing hard cover that the first squad set up.
- Move to a different map. If you only need crafting materials and basic supplies, Buried City, The Blue Gate, Spaceport, Stella Montis, and Riven Tides all have their own supply drop call sites, as listed in the same reference. Switching maps is a legitimate answer when the central dam is too hot, and it is often the right call when your kit is already in good shape.
The wider point is that the supply drop system is shared across every ARC Raiders field. A call station on Dam Battlegrounds is the same kind of object as one on Riven Tides, so the underlying call animation, the flare, the descending pod, and the breach mechanic are identical. The only thing that changes between maps is the terrain, which means the same four-phase plan above can be carried to any field with minor adjustments to the cover ring and the overwatch lanes.
Comparing Call Station behavior across ARC Raiders maps
The same core loop exists on every map, but the surrounding terrain changes the feel. The table below compares the broad shape of each map’s Call Station distribution, using the descriptions published for the supply call system. Use it as a quick reference for which field best fits your current loadout and squad size.
| Map | Call Station density | Typical terrain | Notable risk |
|---|---|---|---|
| Dam Battlegrounds | High, clustered near the center | Concrete dam, spillway, gantries, service walkways | Most other squads also target the central area, so early fights are dense |
| Buried City | Low, fewer documented pins | Urban ruins, narrow streets, interior floors | Limited supply sites, so each one draws a fight |
| The Blue Gate | Moderate, mixed open and covered | Gate structures, mixed open ground | Higher than normal ARC presence in addition to other raiders |
| Spaceport | Moderate, scattered across the field | Open tarmac, hangars, service roads | Long sightlines expose the call animation from far away |
| Stella Montis | Concentrated but contained | Research complex, interior and rooftop | Tight corridors make rotation between antennas risky |
| Riven Tides | Scattered along the coast and platforms | Coastal platforms, walkways over water | Limited cover between sites, easy to be cut off from extraction |
This table is a planning aid, not a guarantee. Spawn positions and current lobby behavior always override a static map description, and the density numbers shift slightly between patches as the developers rebalance the system. Use the table to pick a field for a specific goal, then rely on the per-map pin list for the actual route.
Common failure modes on a Dam Battlegrounds call
Even For additional context, experienced squads lose supply drops on this map. The failures usually fall into the same handful of patterns, and each one has a clear early warning that shows up before the flare finishes climbing.
Calling from the wrong cover
Standing on an open pad with no break in line of sight is the most common mistake. The flare reveals you, and the overwatch lanes that overlook the central dam are easy to occupy. Choose a Call Station whose nearest cover ring includes a hard wall, not just a railing, and check that the wall blocks the angle an enemy squad is most likely to use.
Ignoring the audio cue
The summon animation has a distinct sound that carries across the central cluster. If you hear it while you are still on approach, the antenna is already in use. Pushing in anyway usually walks you into a prepared defense, and a prepared defense on Dam Battlegrounds usually means a squad already holding the cover ring and one of the overwatch lanes.
Misreading the pod drift
The pod does not always land on the antenna. Wind, map geometry, and the angle of the parachute can shift the drop point by several meters, and on the upper gantry the pod can drift far enough that the breach happens in a different part of the walkway than the call. Plan your breach route before the pod lands rather than after, and pick a piece of cover that you can reach from either the antenna’s footprint or the pod’s likely footprint.
Loitering after the breach
The flare fades slowly, and the breach itself takes time. A second squad that saw the flare will often push in while you are still at the pod, especially if your first breach took longer than expected. Decide before you breach if you are extracting immediately or holding for a third-party kill, split loot accordingly, and do not let the loot screen stretch past the moment the second squad appears on the edge of the cover ring.
Forgetting about ARC units
The flare is the loudest signal on the field, but the dam also has its own ARC presence. A call that pulls human raiders to your position can also pull ARC units into the same corridor. On a quiet lobby, ARC units are the bigger threat. On a busy lobby, human raiders are. Plan for both, and do not assume a quiet cluster means a safe one.
Solo versus squad play on a Dam Battlegrounds call
Solo raiders can still use Call Stations, but the risk profile is different. A solo player who triggers the flare has no overwatch, no one to hold a flanking lane, and no one to peel a third party off the pod. A squad has the opposite problem: more bodies means more visibility, and a coordinated defense is harder to crack than a lone antenna. Picking the right antenna for your group size is part of getting the call to work.
The table below summarizes the trade-offs at a glance.
| Factor | Solo run | Squad run |
|---|---|---|
| Call safety | Low. You stand in the open during the animation with no overwatch. | High if the squad secures the cover ring and an overwatch lane. |
| Pod recovery | Fast. One breach, one extract. | Slower. Loot split, role assignment, longer exposure. |
| Third-party risk | Usually gets pushed out rather than killed. | Often gets contested by another full squad. |
| Best antenna choice | An outer, less obvious pin with strong nearby cover. | A central pin with good cover and a clear overwatch position. |
| Extraction window | Short. Leave as soon as the container is empty. | Flexible. Squad can hold or rotate for a second call. |
| Recommended call count per round | One, then extract. | One or two, depending on the lobby. |
Neither style is strictly better. The map rewards whichever style matches the lobby, the squad’s gear, and the time remaining in the session. A solo run on the upper service gantry can extract a full pod with no contest in a quiet match, while a squad that tries the same on a busy match will usually get third-partied before the breach animation finishes.
Audio and visual tells to learn on Dam Battlegrounds
Every Call Station interaction produces a recognizable set of cues. Learning them turns the central dam from a chaotic sprint into a readable engagement, because the cluster’s geometry makes sound and sightline discipline more important than raw aim.
- The summon chime. A short electronic tone plays when the antenna is first activated. This is the earliest signal that a Call Station is in use, and it carries across the central area in a way that the visual flare does not.
- The vertical flare. A bright, slowly rising flare marks the antenna’s position. On a clear day over the dam’s concrete, it is visible from almost anywhere on the map, which is exactly why the call exposes you to the whole lobby.
- The pod’s parachute opening. A second audio cue plays as the supply pod deploys its chute. By the time you hear it, the pod is committed to a landing zone, so this is the last moment to adjust your breach route.
- The breach hiss. The container’s hatch opens with a mechanical sound. This is your signal that the loot is now available, and that the flare window is about to close. Treat it as a five-second timer rather than a green light to stay.
Pair the audio tells with visual scanning. Most of the antennas on Dam Battlegrounds sit in the same general area, so once you spot one flare, the surrounding antennas are easy to keep in your peripheral vision. The first squad to read all four cues at once usually wins the pod, because they make their decision before the rest of the lobby has finished processing the flare.
How this fits the wider ARC Raiders loop
Call Stations are one source of supplies among several. They sit alongside field loot, salvage, and drops from ARC units. The reason to seek out a call station Dam Battlegrounds run specifically is that the central cluster produces reliable, mid-tier loot in a known location, which is useful for rebuilding a kit after a bad extract or for stockpiling crafting materials before a longer push. The reliability is the draw, not the ceiling: a top-tier drop can come from a successful call on any map, but Dam Battlegrounds is the one where you can plan the route in advance and trust the spawn pattern.
It also pays to think of Call Stations as a signal, not just a reward. The flare tells the rest of the lobby exactly where you are, so every successful call is also a small invitation to a fight. A squad that is happy to take that fight can use a Call Station as bait, falling back to prepared cover while the second squad commits. A solo player who only wants the loot should extract immediately after the breach and let the bait strategy belong to a different engagement. The mechanic is the same in both cases, but the right response depends on whether you came for the pod or for the kill.
Pairing Call Stations with extraction timing
One of the most overlooked parts of a Call Station run is the timer. The supply drop is only useful if you can get it out of the field, and the extraction timer does not pause for the call animation or the pod descent. A few habits keep the timer from becoming a problem.
- Check the clock before you start the call. If the round is close to ending, the call is usually a mistake unless the antenna is on your extract path.
- Pick the antenna that sits closest to your planned extract route. A pod from the spillway apron is wasted if you have to run past the upper gantry to reach the extract zone.
- Decide the extract before you start the call, not after. A pod in hand is only worth the time if you have a clear path to the extract zone within the timer.
- Do not chain calls if the round is already past the halfway mark. Two pods are not worth losing the first one on the timer.
These habits look obvious in writing and easy to ignore in a match, especially when the flare from a contested antenna is already in the sky. Treating the timer as part of the antenna choice, not a separate concern after the call, is the difference between a full extract and a lost pod.
Loadout choices that pair well with a Dam Battlegrounds call
The map’s geometry rewards certain loadouts over others. A loadout that works on Buried City or Stella Montis is not always the right choice here, because the dam forces you to spend time on open concrete with long sightlines.
- Mid-range weapons. The central cluster is mostly medium range. A close-range shotgun build is good for the breach itself but bad for holding the cover ring during the call.
- Grenades and area tools. A second squad that pushes your call is the most common reason a pod gets stolen. Grenades let you hold the cover ring without leaving the antenna.
- Light armor for solo runs, mid armor for squads. A solo player cannot afford to tank a fight, so mobility matters more than durability. A squad benefits from the extra time mid armor buys during the breach.
- A scanner or detection tool. The upper gantries make audio unreliable. A scanner lets you confirm whether the overwatch lane is actually held before you start the call.
None of these are required. They are the loadout choices that make the four-phase plan above easier to execute, especially the call window and the extraction. A squad that runs a long-range sniper kit can also win calls on this map, but only if the sniper is dedicated to holding an overwatch lane while the rest of the squad runs the antenna.
Quick checklist before you commit to a Call Station
Before you start the summon animation on any antenna in the Dam Battlegrounds cluster, run through the same short list. It is short on purpose: the call window is brief, and the decisions have to be fast.
- Confirm the antenna is unclaimed. Look for an active flare, listen for the summon chime, and check the platform for bodies or bloodstains.
- Confirm the cover ring. Identify one hard wall, one piece of low cover, and one escape route before you start.
- Confirm the overwatch lane. Decide who, if anyone, will hold the elevated position that looks down on the antenna.
- Confirm the pod landing zone. Pick a breach route that accounts for drift, not just the antenna’s exact position.
- Confirm the extraction path. Mark the route to the extraction zone on your mental map, including a fallback if the primary path is blocked.
- Confirm the timer. Make sure the round has enough time left for the call, the breach, and the run to extract.
- Confirm the loadout. Make sure the gear you are carrying can hold the cover ring for the length of the call animation.
If any of those seven points is unclear, the call is not safe. Walk to a different antenna, switch maps, or skip the call for this round and scavenge instead. The map gives you another match in a few minutes, and a forced call on a contested antenna is one of the most common ways to lose a full kit on Dam Battlegrounds.
Frequently asked questions
Where are the call station Dam Battlegrounds locations?
The documented Call Stations on the Dam Battlegrounds map are concentrated in the central area around the dam itself, with most pins on flat gantries, low rooftops, and the open concrete pads near the spillway. Because spawns are not guaranteed every match, treat published pin maps as a planning aid rather than a fixed route.
Do Call Stations always spawn on Dam Battlegrounds?
No. The same description that applies to the rest of the ARC Raiders maps applies here as well: Call Stations are not guaranteed to spawn in the same place every match, and other raiders can reach them first and clear the supply before you arrive.
How long does the supply drop call take?
It takes some time to summon a Supply Drop at a Call Station, which is why the flare is so important. The exact seconds are not part of the documented base description, so use the summon chime as your timing reference and treat the call as a vulnerable window rather than a fixed number of seconds.
Does the flare show my exact location?
Yes. The flare that fires when you request a Supply Drop is designed to let the entire lobby know your position, so the call is both a tool and a warning. Plan around the fact that every other active squad can see roughly where you are.
Can I call a supply drop if another squad is already using the antenna?
No. A Call Station can only handle one active call at a time, and a pod that has already been breached will be empty. If you arrive and the platform is occupied, your realistic options are to fight, to wait, or to move to a different antenna in the same cluster.
Is Dam Battlegrounds the best map for supply drops?
It depends on your goal. Dam Battlegrounds has the highest density of Call Stations, which makes it good for short, loot-focused runs. Buried City has fewer sites, The Blue Gate has a higher ARC presence, Spaceport and Stella Montis have their own distributions, and Riven Tides spreads the sites along the coast. Pick by lobby behavior and squad style, not by a single best map.
Should I extract immediately after breaching the pod?
For solo players, yes. For squads, it depends on whether you want to push a second antenna while the lobby is still reacting to your first flare. The safest default is to extract after the first breach and treat any further calls as a deliberate risk.
What is the difference between a Call Station and an ARC drop?
A Call Station is a player-activated antenna that calls a player-targeted Supply Drop. An ARC drop is a separate, environment-driven event. Call Stations are predictable if you control the timing, while ARC drops depend on map state and are not something you can trigger at will.
Can I use the supply drop call as bait?
Yes, and on Dam Battlegrounds it is a common strategy. Because the flare reveals your position, a prepared squad can deliberately trigger a call, fall back to hard cover, and let an aggressive second squad push into a prepared defense. The same mechanic that makes Call Stations risky also makes them a useful tool for controlling the central area.
Which antenna is the safest for a solo run?
The upper service gantry is usually the safest pick for a solo run because few angles look up at it directly, and the breach happens in a small area that is easy to clear. The dry concrete pad by the intake is the worst pick for a solo run because two overwatch lanes cover it at once, and a solo player cannot hold either.